MCA Data Server

MCA Data Server

The MCA Data Server (MDS) provides client access to all of Bridgeport's MCA.

Purpose

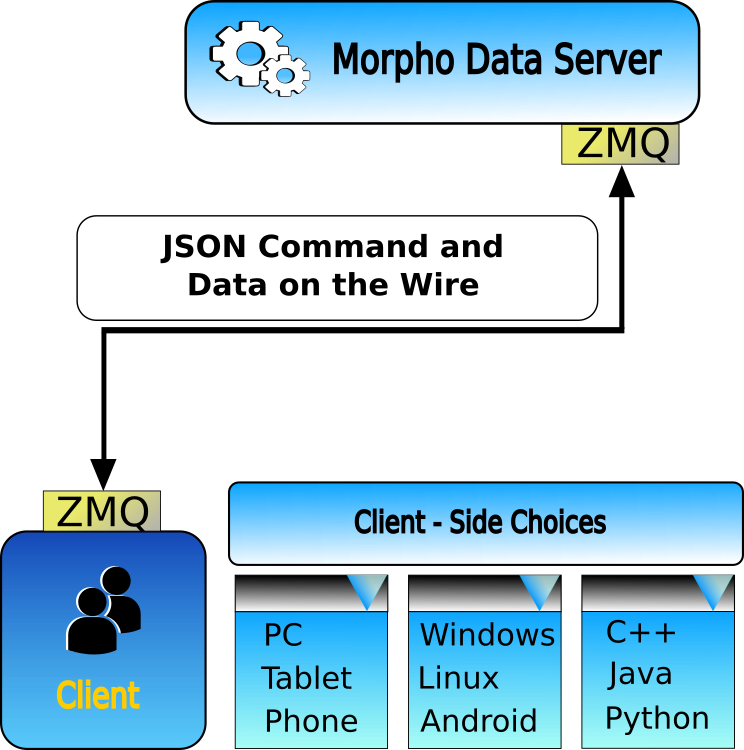
Data acquisition and device driver: The purpose of the MCA Data Server is to provide high-level access to the radiation detectors and their MCA's. It acts as a bridge between the MCA's on the USB side and clients on the internet. Being a true server, the MDS can be accessed by client software written in 40+ diferent programming languages.

Hardware simulator: The MDS can launch a simulator to model Bridgeport's MCAs. This "try-before-you-buy" feature is also useful to write and test data-acquisition client code when working from home without direct access to the MCA and a detector.

Software stack:The MDS is a layered software stack. Most often a client gains access through the ZMQ server interface – virtually in any programming language they desire. Alternatively, client software can access the command layer or the API layer directly using Python.

Commands sent to the ZMQ server interface are sent as JSON strings of the form {"type": "mca_cmd", "name":"read_mca", "sn": "eRC5000"}

See the MDS documentation for a detailed description of all MDS commands.

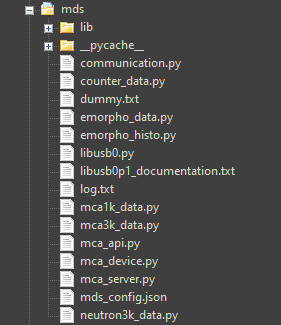
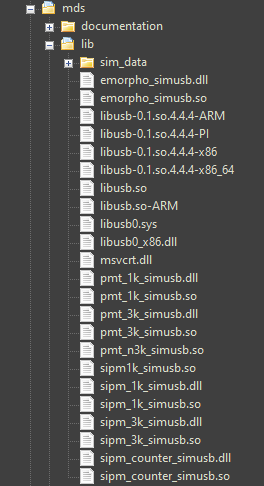
The MDS source files are in the folder /wxMCA/mds/

There are also commands that address the MDS itself, as opposed to detector commands, eg get_pid and exit.

MCA Data Server

MDS Structure

MDS – Software Stack
ZMQProtocol layer for robust TCP/IP socket communication; accessible in 40+ programming languages.
mca_server.pyUser code can access this in 40+ languages via ZMQ
mca_api.pyUser can access this API code in Python using dictionaries for commands.
emorpho_data.py, mca1k_data.py, mca3k_data.pyMCA-specific data definitions.
mca_device.py Morpho device driver and bridge to libusb
libusb0.py ctypes interface to libusb0.1 (on windows libusb_win32)
libusb0.1 Generic user space USB driver for Win XP/7/10 and Linux; available on x86, x64, and ARM processors.
MCA MCA module connected via USB
MCA Data Server software stack. Only the libusb USB-driver depends on hardware and OS. It has been implemented on x86/x64/ARM under Win 7/8/10 (signed driver) and Linux

Run the MDS

The MCA Data Server reads its configuration file only on start up. So, for any edits to take effect you must terminate and restart the MDS.

This may be done under manual control. If the MDS is running under the control of the MCA Data Daemon (MDD) you can quit the MDS and let the MDD respawn it.

How to start the MDS

  • Manually: On Windows, double-click on the MDS icon on the desktop; or double-click on run_mds.cmd in the wxMCA folder . Under Linux use python wxMCA/mds/mca_server.py .
  • Automatically: When using the MDD, let the MDD start the MDS for you by setting mds_present to 1 in the mdd_config file.

How to quit the MDS

  • Kill: Manually find the process and kill it.
  • MDS command: Send the command {"type": "server_cmd", "name": "exit"} to the MDS and it will exit.
  • MDD command: Send the command {"type":"mdd_cmd", "name": "stop_mds"} to the MCA Data Daemon and it will force the MDS to exit.

See the MDS documentation for a detailed description.

MDS DAQ and Simulator libraries

Run the Simulator

To run the simulator you must edit the mds/mds_config.json file. It is a json file and the relevant part is shown below.

"simulate": "PMT-N3000", "comments": { "simulate": "One of ['None', 'eMorpho', 'SiPM-Counter', 'PMT-1000', 'SiPM-1000', 'PMT-3000', 'SiPM-3000', 'PMT-N3000']" }

Select a device to simulate, save the file and relaunch the MDS. Select None to go back to using a real MCA instead of a simulated one.

Simulation takes priority: Note that the simulation takes priority over the hardware. If a simulation device is detected, the MDS will not recognize and plugged-in hardware.

The simulation is implemented in shared ojects (*.so for Linux) and dynamic link libraries (*.dll for Windows).

See the MDS documentation for a detailed description.